Part Origin
Now that a file system has been created, the partition needs to be made accessible. In order to do this, the partition needs to be mounted at a chosen mount point. For the purposes of this book, it is assumed that the file system is mounted under /mnt/lfs, but the directory choice is up to you.
Choose a mount point and assign it to the LFS environment variable by running:
export LFS=/mnt/lfs
Next, create the mount point and mount the LFS file system by running:
mkdir -pv $LFS
mount -v -t ext4 /dev/<xxx> $LFS
Replace
If using multiple partitions for LFS (e.g., one for / and another for /usr), mount them using:
mkdir -pv $LFS
mount -v -t ext4 /dev/<xxx> $LFS
mkdir -v $LFS/usr
mount -v -t ext4 /dev/<yyy> $LFS/usr
Replace
Ensure that this new partition is not mounted with permissions that are too restrictive (such as the nosuid or nodev options). Run the mount command without any parameters to see what options are set for the mounted LFS partition. If nosuid, nodev, and/or noatime are set, the partition will need to be remounted.
If you are using a swap partition, ensure that it is enabled using the swapon command:
/sbin/swapon -v /dev/<zzz>
Replace
Now that there is an established place to work, it is time to download the packages.
译文:
好了,现在一个文件系统已经被成功的创建了,我们需要使分区能够被访问。为了达到这个目的,我们要为分区选择一个挂载点。本书假设将文件系统挂载在/mnt/lfs下,但目录的选择由你决定。
选择一个挂载点,通过运行命令:
export LFS=/mnt/lfs
来分配LFS环境变量。
接下来,建立挂载点并挂载:
mkdir -pv $LFS
mount -v -t ext4 /dev/<xxx> $LFS
替换
如果要为LFS使用多个分区,例如一个/分区和另一个/usr分区,通过下面的命令来挂载他们,
mkdir -pv $LFS
mount -v -t ext4 /dev/<xxx> $LFS
mkdir -pv $LFS/usr
mount -v -t ext4 /dev/<yyy> $LFS/usr
替换
确保这个新的分区没有太多权限限制,比如nosuid或nodev选项等。不带任何参数运行Mount命令,看看挂载Lfs分区都用了哪些参数,如果Nosuid,nodev, notime被设置,需要重新挂载分区。
如果你使用交换分区,可以使用如下命令,保证交换分区开启:
/sbin/swapon -v /dev/<zzz>
替换
好了,现在已经建好的工作目录,是时候下载软件包了。
fstab 一些说明
fstab中存放了与分区有关的重要信息,其中每一行为一个分区记录,每一行又可分为六个部份,下面以
/dev/sdb1 / ext2 defaults 1 1为例
第一项是您想要mount的储存装置的实体位置,如hdb或如上例的/dev/hda7。 可用UUID来代替。
第二项就是您想要将其加入至哪个目录位置,如/home或如上例的/,这其实就是在安装时提示的挂入点。
第三项就是所谓的local filesystem,其包含了以下格式:如ext、ext2、msdos、iso9660、nfs、swap等,或如上例的ext2,可以参见/prco/filesystems说明。
第四项就是您mount时,所要设定的状态,如ro(只读)或如上例的defaults(包括了其它参数如rw、suid、exec、auto、nouser、async),可以参见「mount nfs」。
提供DUMP功能,在系统DUMP时是否需要BACKUP的标志位,其内定值是0。
第六项是设定此filesystem是否要在开机时做check的动作,除了root的filesystem其必要的check为1之外,其它皆可视需要设定,内定值是0。
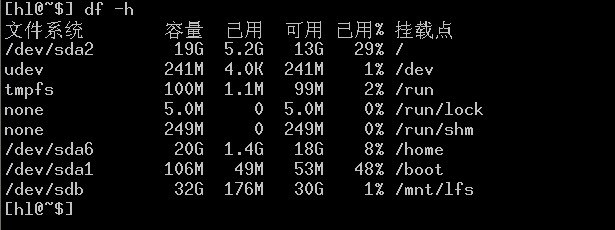
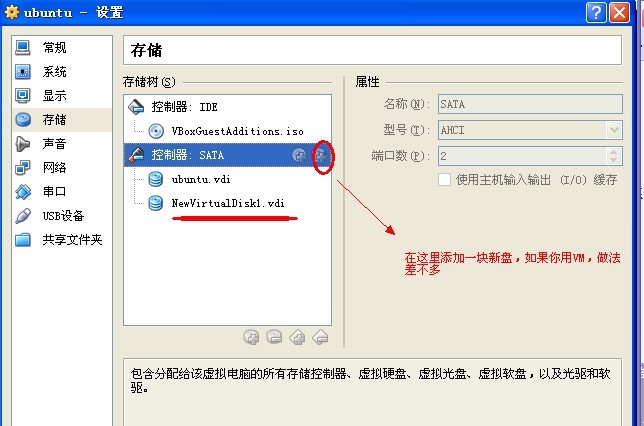
我的环境搭建
由于是在虚拟机上的,盘不够大,所以新建了一块盘,动作如下:
Step1.
Step2.
sudo fdisk -l #查看新盘
sudo fdisk /dev/sdb #我的是这个
选择n<enter>,
选择e<enter>,
选择w<enter>
Step2.
sudo mkfs.ext4 /dev/sdb
选:y<enter>
Step3.
sudo mkdir -pv /mnt/lfs
sudo mount /dev/sdb1 /mnt/lfs